Tuesday, September 20, 2011

Roadside Shrine

Just finished the roadside shrine with the Warrior's statue. Hope it will give the games some Westeros-flavour.

I'm thinking of doing a goodswood next. Does anyone have some spare GW trees? They would make great weirwoods...


Saturday, September 17, 2011

WIP: Ours is the Fury!

I couldn't wait working on the general of my Impetus army, Robert Baratheon, Lord of the Stormlands, known as "The Usurper". Base-model is the "Count of Vendome" of the Perry Agincourt range. I sanded off all the heraldry, resculpted the livery and added his famous warhammer and antlers.
I'm still uncertain about the antlers. These are just taken from a 5th Edition Bretonnian knight and don't have the "aggressive" look I aimed at.


Thursday, September 15, 2011

Making a Terrain Mat

Sweetwater forums' fabulous thread about Terrain-Mats motivated me to try this method myself. Conducting a test run, I built a simple photography-mat without fancy structures.
Unique about these mats is, that they are built really quick. This one took me just about 1,5 hours, including the time for searching the materials (which I fortunately all had at hand...).

Base material is stretched canvas on a 70x70cm frame. The one I used was already painted, but just because it was a leftover of a painting session... Unpainted/unprimed canvas would have been better.

 To give the mat a realistic strucure, I mixed brown acrylic paint, sand and coffeepowder. Coffeepowder was a tip from the internet. Well it works, but the mat smells like a Starbucks...

 Acrilic sealant was added to the colour-paste. For the whole mat I needed less than a half tube.

The paste was spread over the canvas. It works as well if you directly mix the paste on the mat.

The paste was smoothed, using a palette-knife/ spoon/ fingers/ whatever you have at hand...

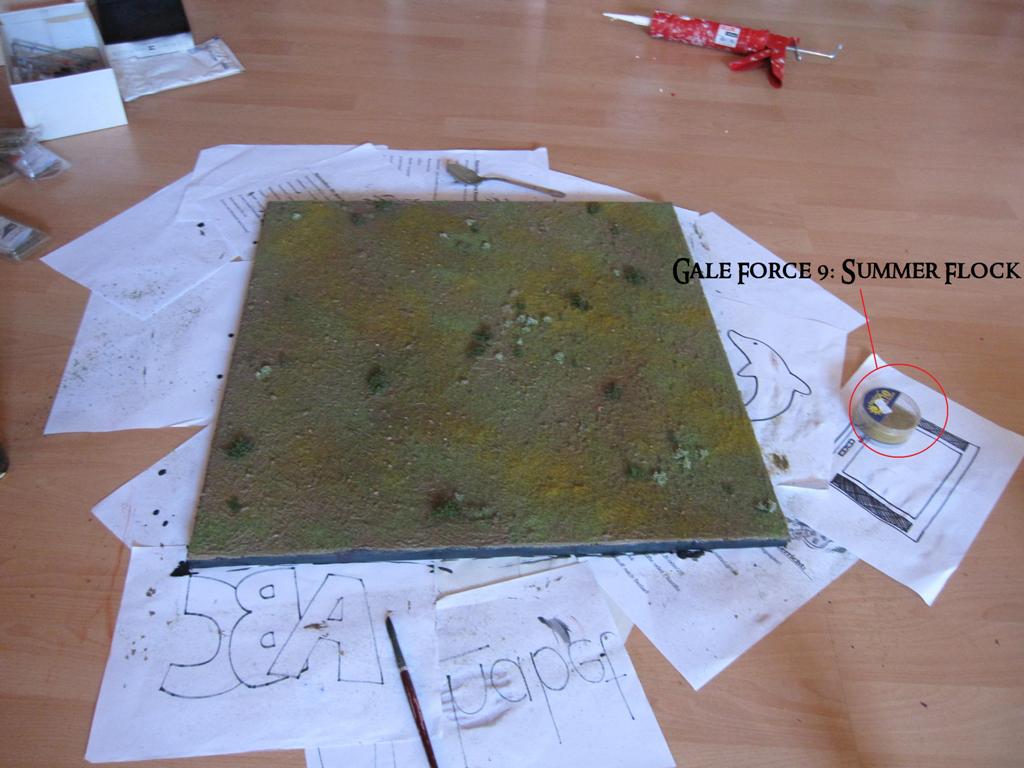
Next step already is the greening. I used several flocks and static grasses to produce an irregluar basis. The trick is to spread the flocking material over the mat at random and just press them into the wet acrilic paste. Since the grass will stick to the paste you neither need glue, nor need to wait for the surface to dry. 
This "basecoat" was further worked on with some MiniNatur tufts, some Atenociti foliage and brown spray paint. At the end I highlighted some parts with Galeforce 9: Summer Flock.

Done in less than two hous. Last thing that's needed is some patience to let the Acrylics dry. Afterwards you can cut the mat off the frame to get a terrain that is more or less resilient, can be rolled up, needs little place and still looks as great as a regular terrain board.
I abandoned this option since I just wanted a surface to take some pictures on.

Hope you liked it. Credits have to be given to the guys over at Sweetwater. Having in mind how easy this was, the result is truly stunning.

Monday, September 12, 2011

New Banner

 As you can see, my blog has a new banner. I finished my photography mat today and couldn't wait taking a picture and try some of this Photoshop-voodoo that makes all the other miniatures over at Sweetwater or the LAF look so cool.

Yeah, works for me... I never tried picture editing before, but in my eyes, the new banner itself is worth the effort.
At least it's way cooler than the old one, done with Microsoft Paint.


Saturday, September 10, 2011

The Warrior Protects

After I sculpted the saint's statue for Rusus, I did another one for myself:

The Warrior. He represents one of the aspects of the Faith of the Seven, the primary religion of George R. R. Martin's Westeros.
Funny little guy. Reminds me a bit of the figures of the "The Settlers" PC-games.


Wednesday, September 7, 2011

A Lannister Always Pays His Debts!

Centuries ago I promised Rusus to sculpt a little statue for his roadside shrine.
I nearly forgot this until yesterday, when I found a copy of the shrine.

Well, a Lannister pays his debts and I felt obliged not to dissapoint Rusus, so here it is:


The statue measures 10mm and is loosely based upon a statue of Elisabeth of Hungary which can be found in St. Elisabeth's Church in Marburg.

Tuesday, September 6, 2011

Hear Me Roar!

Inspired by these great Stark bannermen made by Frank Becker, I am hooked on the whole Ice and Fire topic and have given some thoughts to ASoIaF-themed Impetus dioramas.
My first intension was to paint parts of the Stormlands army of Robert Baratheon during his rebellion against the Targaryens. Meanwhile I will go for a rather all-purpose "army" consisting of some major houses which will be able to cover most battles from the Blackfire Rebellion to the War of the Usurper.

 After sorting my lead-chamber for fitting miniatures I found my old 5th. Ed. Bretonnians which will make great Westerosi knights. I painted one of them as a test-miniature, since most of my miniatures will consist of the Perry "Agincourt to Orleans" range but are still in the mail.

The miniature pictures a member of House Lannister. As I said, my army will consist of contingents of every great house, mixed with heroes of the Blackfire Rebellion and the War of the Usurper. This lord suits as Damon or Tywin Lannister and might be used in both periods. He is accompanied by a squire who carries a great wooden chest with unknown content. According to his posture and the fact that his master is a Lannister it's probably gold...


The miniature is based on 1,5mm plasticcard with the measurements 6x8cm which relates to Impetus Fantasticus hero basing. The paper pennant is adopted from Tankred's Feud of Kronberg cavalry.
The reason for using armour styles around 1400 is to be found in this letter from GRRM himself, which can be found in the "So Spake Martin" section of westeros.org. I actually will try to stay closer to the 15th century as the author himself did, but thats my personal preference.


Last but not least: The famous words of House Lannister, embroidered on the lord's crest.

Sunday, September 4, 2011

Pimp My Cardboard Building - Part III

 I finally painted the buildings:


All in all I spent two evenings with this project, casually watching TV. To my mind a quite acceptable amount of work.

Thursday, September 1, 2011

Pimp My Cardboard Building - Part II

The farm-house is next:

Again I started with the wooden parts. I cut some balsa stripes with 3mm thickness and remodelled the framework printed on the building. Of cours you could do this technique with evey other skeletal structure as well, but the printed surface of the cardboard helped me as a beginner to get used to the sizes and measures.
 The half timbered work was filled with Efaplast Light, an air drying modelling clay. You dont ncessarily need to use the light version. Classic or Terracotta would probably work as well, but this is what I normally use for basing my miniatures, so I had it at hand.

 Next I had to get rid of the chimney. I didn't like the position and wanted it to bit a bit smaller. I rolled out some of the Efaplast and let it become touch dry. I cut some bricks from this and masoned a new chimney from that. Wasn't even as hard as I thought. Maybe I'll try this method with castle walls some day...

 Last step: The roof was done with paperboard shingles.
 And done... Never thought terrain building could be that easy... Maybe the most anoing part is the roof, because it takes centuries to affix every single shingle, but I like the scattered look of it and that's probably worth it.